I will not discuss modifying your flash with bounce or modifiers, but I will assume that you are not using direct flash. Direct flash is terribly unflattering. I'll assume that you will either bounce the flash or use a modifier like softbox or umbrella.
For people photography with flash, here is my plan: We will subdue the effect from the ambient lighting on the subject such that it will barely register on the subject. Why? Because balancing the color cast of the ambient light and flash is very difficult even with gel. (If you have a strong reason to balance the ambient and flash, please read Section 3. of this guide.) Then, we will properly expose for the people solely with the flash.
The following settings will be suitable for this plan:
- Exposure mode: Manual mode
- Shutter speed: 1/500
- Metering mode: any
- AF-area mode: your choice (single area preferred, but you can use closest subject)
- Flash metering mode: TTL
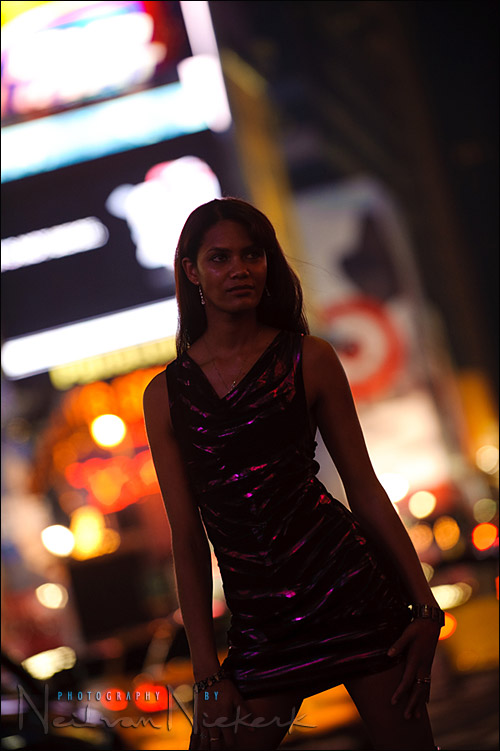
I strongly recommend that you work in the Manual mode for flash photography. It's very daunting at first, but it gives you most predictability and control when you have to control two lighting source (ambient and flash). First, select the aperture that will give you the desired depth of field. Then adjust the shutter speed so that no or very little ambient light falls on the subject. (The 1/500 shutter speed is the x-sync speed of D40, which is faster than most DSLR cameras thanks to the electronic shutter of D40.) If sufficiently high shutter speed dims the ambient light on the subject but leaves background recognizable, this is good. (You are dragging the shutter here.) Then take a test shot. If the result you see on the LCD still has ambient light falling on the subject, then DECREASE the ISO and repeat until there is no to very little ambient light on the subject. (We call this iterative process "chimping", as if a chimpanzee were looking at an LCD screen and giggling.) If ISO 200 (the lowest ISO on D40) and 1/500 does not kill the ambient light enough on the subject, then you will have to use a smaller aperture. As you can see, the metering mode does not matter in this workflow. The final look of the ambient only exposure will appear something like this:
TTL or TTL-BL?
Once you have achieved satisfactory (read "heavily underexposed") ambient exposure with a series of test shots, turn on the flash. The most important part here is to put the flash on the "TTL" mode, NOT "TTL-BL" mode. This article illustrates the differences between TTL and TTL-BL. According to that article, it looks like TTL-BL is more intelligent and should be used for indoor flash as well. The thing is that I assume we will all be using bounce flash or off-camera flash for more flattering look. When a flash is not used as direct, on-camera flash, TTL-BL's ability to use the distance data evaporates. You can see how TTL and TTL-BL result in the same exposure in the article above.
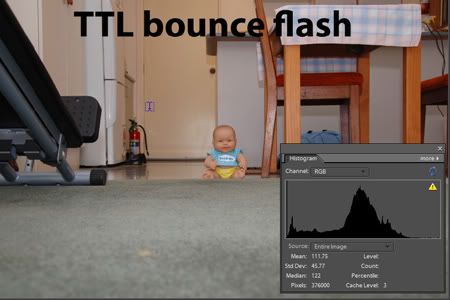
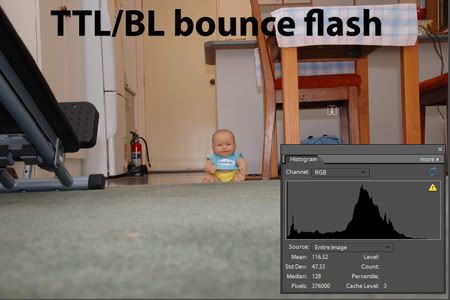
TTL-BL's "intelligence" also introduces unpredictability. It's hard to predict how it will react. TTL is more predictable. And as all machines are, TTL-BL gets tripped in many situations (e.g., error on the D-lens distance calculation, off-camera flash with extension cord) as you read in this article. So we choose TTL for consistency and predictability. Some flashes do not have dedicated mode button that will shift the flash out of the TTL-BL mode to TTL. In that case, choosing the spot metering on D40 compels the flash to use TTL. (But regardless, the TTL will still meter center-weighted, as discussed below.)
Lastly, this blog is good read for understanding Nikon TTL and TTL-BL.
TTL Meters with Weight on Center
With the TTL metering, the flash will expose with "center-weight" metering regardless of the metering method of the camera. (That is why I let you choose any of the three metering mode.) What does this mean? The TTL flash will moderate the power of the flash so that the subject under the center will achieve 18% gray. What if your subject does not have an 18% gray tone? You compensate for the difference with the flash exposure compensation, which adjusts the OUTPUT of the flash. With ambient light photography, you compensated for the difference (between 18% gray and your subject) with the camera's exposure compensation button/dial. But with TTL flash, the camera's exposure stays, and you adjust the amount of flash light that will be shone on the scene.
Why not adjust the camera's exposure setting with the exposure compensation button/dial? Well, the way the TTL is built is that those settings are transparent to the TTL flash. If you change the camera's exposure, the TTL flash will adjust its output so that the center-weighted metering still achieves 18%. It is like a dog chasing its tail.
But even if the flash didn't do this (for example, if the flash was on the manual mode), you'd still want to adjust the flash output rather than tinkering with the camera's exposure. Why? Because changing the camera's exposure setting will now change the ambient exposure too, which we took pain to establish to our liking at the very beginning.
In sum, it is partly because we are working with TTL flash but more importantly because we want to preserve the ambient exposure that we use the output (power) of the flash to compensate for the deviance from the 18% gray.
How do we change the output of the TTL flash? By changing the "flash exposure compensation". Usually your flash has its own flash exposure compensation button (or dial) on the back. (Below is the picture of the flash compensation buttons on SB-800.)

You can also change the flash exposure compensation on D40 by holding the flash button and +/- exposure compensation button together while turning the rear dial.
But I strongly recommend that you use the buttons on the flash, because (1) it is just too much hassle to do it on D40 body, and (2) the changes made in the D40 and the changes made on the flash are sometimes cumulative. It's subject to less error if you leave the flash compensation setting in the body alone and just work on the flash.
Shoot and Adjust
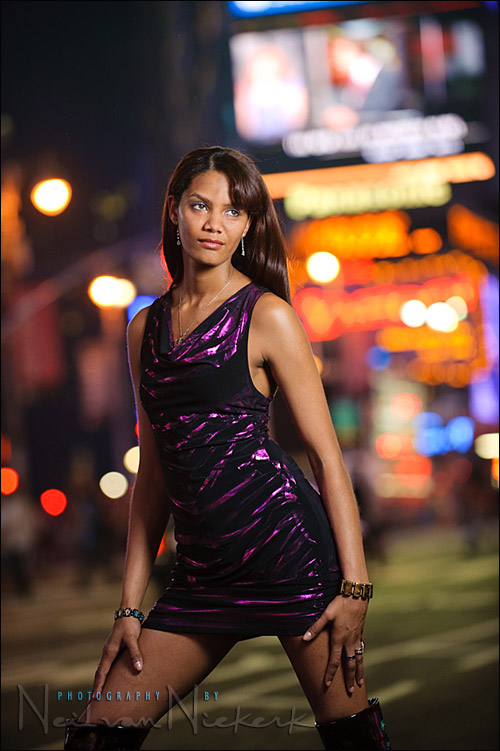
Even with the flash exposure compensation, you will need to take test shots and adjust. It becomes, again, iterative process. The final look you are aiming for is something like this:
Problems with Center-Weighted TTL Metering
Before we begin, this article is a must read.TTL knows only one kind of metering. Center-weighted. TTL flash can't meter off the left or right focus point. (This is the key difference from available light photography, where you could spot meter off all three focus points of D40.) This rigid "center weighted-only" metering of TTL flash creates issues.
(1) What if your object is not at the center?
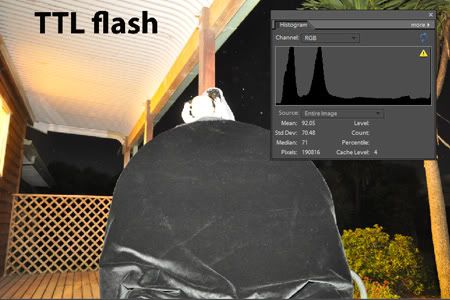
This is a toughie. The center-weighted metering of TTL can create over/underexposure of your subject. As demonstrated below, a black object in the center overexposed your subject (the doll), because the TTL flash was trying to make the center (black) 18% gray, and in the process just poured too much light on the doll (your real subject) as well.
With more recent Nikon cameras, you can use the "flash value lock" button to address this issue. Unfortunately, Nikon D40 does not have a flash value lock button. Admittedly, this is a severe limitation on Nikon D40's flash photography. (I was not aware of this shortcoming when I purchased D40. If I had known it, it would probably have been a deal-breaker for me.)
To be honest there is no easy way out. One way to handle it is to put your subject('s face) at the center so the center-weighted TTL will expose for the subject, shoot and crop later. Another way is to place your subject('s face) under either the left or right focus point, and place some other part of the subject in the center. For example, when you're taking a head and upper body portrait, you can lock focus on the face with the right (or upper) focus point, and place the center focus point (where the center meter is located) on the chest of your subject. The tonal difference between 18% gray and the chest of your subject will be compensated for with flash exposure compensation. For example, if your subject is wearing green, you don't need any flash exposure compensation as the TTL flash will recognize the green as almost 18% gray. Even if your subject were wearing black suit, you can dial in -2 FE compensation and be done. (So, in the demonstration above, the doll would have been exposed for correctly if the FE compensation was dialed down by 2 stops.)
In any event, it is important that whatever falls in the center of the frame is about the same distance away from the flash as your subject. Then all you have to do is to compensate for the tonal difference between that object an 18% gray with flash exposure compensation. If what happens to fall in the center of the frame is not the same distance away from the flash as your subject, then it changes everything. The name of the game changes from flash exposure compensation to the law of inverse square, as you have to calculate how much light you artificially increase/decrease so that your subject will receive proper amount of light. Needless to say, this calculation is much more difficult to handle on the spot.
The worst thing to do is to put some hollow background in the center. The TTL flash will try to make some light reach that distant background, and in the process overexpose everything else closer. (Think the the law of inverse square.) Therefore, whatever you do, never leave the center of the frame hollow.
If all else fails, you can always revert to chimping. Take a shot, and adjust the flash exposure compensation on the flash until you are satisfied with your subject's exposure on the LCD screen.
(2) What if there is a highly reflective (bright) object off the center?
Some TTL systems are sensitive highly reflective object even outside the metering area. Nikon's TTL does not behave this way. So you don't have to worry about the TTL flash cutting off the power and underexposing for your subject just because a highly reflective object is located within the frame. That does not mean it is good practice to leave a highly reflective object in the frame. It will still be very distracting in the final result. So, it is advisable that any highly reflective object is removed from the frame, not because it interferes with the TTL metering, but because it's aesthetically not desirable. This is another reason that I recommend TTL over TTL-BL, as TTL-BL will bias for objects under the left and right focus points.
No comments:
Post a Comment